Tuesday, 22 September 2015

Psst .... only 94 days till Christmas!


and I have indulged in some early (very) Christmas hooking. I have been quiet but I have been busy, laid low with bronchitis that I feel is not done with me yet, these cute decorations have kept me company, along with many, many cups of tea!


First up is a Christmas Star with a cheeky face, Nathan embroidered in white and two little bells to finish it off. The pattern is from Julie at Little Woolie blog, the face is a simple circle in UK Dc/US Sc, eyes are French Knots and the smile is Backstitch. This little star will be winging it's way to a sweet little boy together with his Minion beanie I made him.


These two are made from the same pattern, each finished with a shiny brassy coloured button on both sides and brass bead loops.

Next are the absolute cutest Gingerbread Men .. this sweet pattern is from Repeat Crafter Me.  I experimented with different colours of brown yarn and size hooks.  They all need loops added, and I may use red ric-rac just for something different.


I am 'hooked' on these beautiful Hearts, with roses and leaves from Lucy at Attic 24 on the purple, shiny purple and blue hearts and Jolly holly again from Attic 24 on the white heart.  I fashioned the berries as I went along, so no pattern.  There are many berry patterns on Pinterest. 


This is an easy and very sweet star from my good friend Zelna at Zooty Owl Blog.  I will be making many more of these I think.


Next up is such a cute and very popular little Christmas sock ornament, pattern from Angie at Le monde de Sucrette. I couldn't stop, once I had made one I just could not stop!!


The last ornaments are made with two circles of the same size. To see how to make circles, link to this post of mine, and follow the first three rows or so, depending on how large you want your ornament.   Crochet them together with UK Dc/US Sc almost to the end, then fill with a little wadding or what ever you have handy, even snipped off threads from your other crochet projects will do.  Complete closing the circles remembering to add a little hanging loop, and then decorate with holly or beads or whatever takes your fancy.


Pinterest is a gold mine of crochet Christmas ornaments and decorations.  Check out my board Christmas Handmade for more super ideas.

I am filling an order for three blankets for a good friend now, so the red, white and green yarn is packed away for a little while!  More on these projects later!

Thank you for joining me, till next time,
love to all xxxxxxxxx Pat


Wednesday, 16 September 2015

Richard's C2C cushion

My first C2C project and it was such fun! Surely one of the easiest patterns once you get the hang of it, works up super fast, and is so pleasing to the eye!  

In this post last year, are pictures of the Ripple Blanket I made for my youngest son Richard for his 30th birthday.  It is quite fabulous, the colours blending so well.  So when his birthday approached this year, I looked at the left over yarn, and not long after this cushion cover was on my hook! The colours for the blanket and cushion cover were not chosen intentionally with Fall or Autumn in mind ... they were the colours chosen by my son.  However, the browns and tans and golds do rather fit in well with an Autumn theme, cosy and warm.  The yarn is a local Double Knit, and I used double thread throughout and a size 7mm hook. It is plump, soft and comfy, and he loves it!  


It is about 600mm square, with a nice linen inner cushion pad with Hollowfil filling, so that the cover can be removed and washed.


There are some excellent tutorials for the Corner to Corner pattern; I used The Crochet Crowd YouTube pattern, just to get the general idea.  This pattern is also a good one. Felted Button also has a super Ravelry download tutorial.
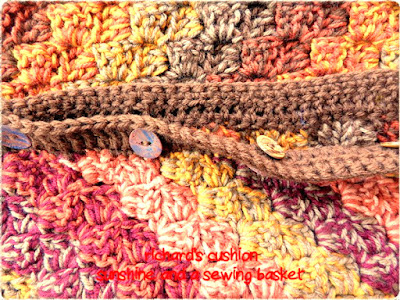
I crocheted two squares measuring exactly the same number of stitches and rows, and stitched the squares together by hand around three sides.  The last side I left open, and finished off with a row of UK Treble (US Double) crochet right around.  Then the buttons went on next ... This post by Lucy of Attic 24 shows in clearer detail (my pics are in browns and not that sharp) how to go about attaching the buttons.  One set of buttons is on the inside of one square, so that they can button through the row and show on the outside.  

Then I added another different set of buttons, a button sewn onto the reverse side of each of the first set of buttons.  Now the cushion has buttons on both sides and can be used either which way up!

My picture below might clear up any confusion! 


One side has slightly different colours to the other, with the buttons matching the appropriate sides.  The photos were very unco-operative, just refused to match up in colours!! Some are darker, some lighter, I have a lot to learn in the photo editing department it would appear! Most frustrating!

Below is the gorgeous Ripple Blanket, so proud of it.


Spring is upon us here in South Africa, such a amazing time of the year with a long awaited thunder storm and lovely rain a weekend or two ago ...  I have a strawberry or two on my new plant, my lemon tree is groaning with new fruit, and the scent as you walk under the tree is too sublime! 

Thank you for reading lovely friends, much love till next time 
Pat xxxxxxxxx