Sunday, 1 May 2016

Our week on the South Coast


It seemed like forever since we had been to the seaside, so as April 9 approached I was feeling especially excited.  We set off on a crisp Saturday morning quite early, driving out of the city and out into the country.  We have had a devastating drought over the last several months here in South Africa, and so it was lovely to see the recent rains had brought some velvety green to the mountains and fields.  


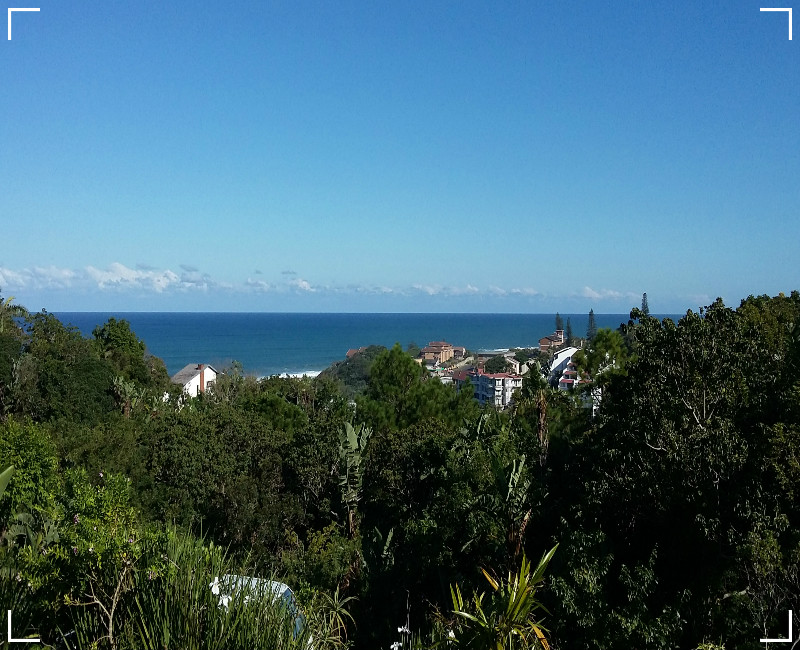
We stopped for breakfast, and then carried on our journey until, after some eight hours we reached our cottage at Ramsgate on the KZN South Coast.  This is the view from the verandah, just beautiful!

The Cow Shed near Leisure Bay is our most favourite daytime eatery, and is always our first stop on our first day!  We sit on the covered verahdah which overlooks the Macadamia Nut trees farmed by the local owner.

I always have the Fresh Vegetable Quiche with salad and tomato relish, it is my favourite lunch, and my David had a Spicy Chicken Salad on Homemade Seed Loaf, very delish!


He opted for a sweet treat to follow, lovely Cheesecake with Berry Coulis!

We tend to eat out often when on holiday, so that we both are free of the usual household chores .. like dishes!  One hot afternoon we stopped at a new little shop called Coffee on the Square in Southbroom for a lunch .. on the right of the pic, the bougainvillea looking beautiful drapped over the patio ..

...  I had a yummy very thick vanilla milkshake 

and David had a very more'ish French Toast with bacon, banana and maple syrup!

Later we went down to Southbroom Beach and sat in the shade just gazing out at the shimmery ocean.

The deep blue ocean was competing with the bright blue skies, each trying to look more beautiful, impossible of course .. each breathtaking!


One morning we went for a long walk, all the way down the hill onto a pretty stone step path .....


and then on down to Ramsgate beach.
Our cottage is right near the top of the hill, to the left and just beneath the first tall tree!


Ramsgate Beach is a Blue Flag beach, very beautiful ..


Ramsgate is famous for The Waffle Den .... the most decadent waffles for every taste .. be it savoury or sweet, quite the most amazing eatery! 
My choice was an Orange Mousse with Chilli Chocolate Sauce .... does that not make your mouth water?

A shady spot with a comfy bench on the pathway from the Waffle Den towards the beach

where the very talented ladies of the area sell their wares, from beautiful beadwork to hats and bags and placemats, shell bracelets and necklaces.


A pathway along the beach took us to another small cove just along from Ramsgate.


After a few lazy days doing nothing much of anything, nice long walks, very yummy food, reading, doing crossword puzzles, and some crochet fitted in as well, time was approaching to leave our sunny seaside abode.  A post coming up soon with my seaside makes!  Here is one of the hats I made .. and wow! the Batman emblem was quite a challenge, but perseverance paid off!


I saved this photo for last, it was so very special an occasion!  Down at the Waffle Den, I met up with my my wonderful bloggie friend and fellow countrywoman, Zelna Olivier of Zooty Owl Blog!  As all our friends in Blogland might have now read, Zelna and her lovely husband Andre have relocated to the South Coast, and we could not pass up on the opportunity to meet!  We had waffles and chatted on and on .. so much to talk about .. and only an afternoon!  We will be sure to meet again when on our next visit to the fabulous KZN South Coast.

And so by far the sweetest Cherries on the Cheesecake were:


Zelna and me!

Thank you for popping by, always such a pleasure!
Pat xxxxxxxx


Tuesday, 12 January 2016

Chevron blankets times 3!


There is an immense sense of delight, pride, accomplishment of purpose and satisfaction when looking at a finished project and one can say "Well done". I said that to myself near the end of November last year, when I set about carefully folding and wrapping a parcel of soft, beautiful blankets.

Early September and with Spring just around the corner! My dear friend in the UK and I started chatting on Messenger about blankets, crochet blankets! And how she finds her granddaughters are very partial to the throw I made her!! And so it came about that we decided I would make her three blankets and send them along with her sister-in-law who was visiting in December. Within a few days we had a plan, we decided on a pattern and colour palettes and next stop was my local specialist yarn shop. The brief .... three granddaughters, three blankets in different colours and using the Chic Chevron Blanket by Red Heart.

Came November, the blankets were done! My sense of achievement was enormous .. I had two bad bouts of bronchitis and we had enduring heatwave conditions through the weeks, and can I tell you, it is so challenging to work with yarn when the temperatures are hitting 32-33 degrees C every day! Buuuut ..... this is what I did;  firstly made sure I was outside on our deck in the cool of the early morning .. the kettle was on at 4:45am some mornings! Secondly as the day progressed I sat with a fan on, ice water to drink on hand, and a near dripping wet face cloth close by that I used constantly to wipe my hands, and drape around my neck and shoulders, the coolness of the icy cold cloth was very refreshing! And lastly I do keep I small bottle of baby talc on hand to shake on my hands to keep them dry!  Now this might all seem a bit extreme, but if you are living in the Southern Hemisphere i.e. South Africa or Australia and no doubt some other countries south of the equator too, we are experiencing the very worst that the current El Nino episode can throw at us. Beastly hot weather, no rain, dusty winds, so hot at night one cannot sleep .. just too awful.

Anyway, back to the blankets. We called the project "The Secret Santa Project" aptly named because the girls and indeed the whole family had no idea they were getting the blankets for Christmas from their Grandma!  Only a necessary handful of folk knew about the project .. right up to Christmas Day when they opened their gifts! The anticipation was delicious! And happily the girls were utterly surprised and quite delighted!

Some details:
First up is the blanket in colours of White, Black, Plum, Emperor Purple, and Parma Violet. Pattern sequence:  4 rows each of White, Emperor Purple and Black and 3 rows each of Plum and Parma Violet.


Second up is the blanket in colours of Sherbet, Aqua, White and Pomegranate. Stripe sequence: Repeats of 4 rows of each colour, then 2 rows of each colour.


Third up is the blanket in colours of White, Sherbet, and Aqua and Aspen. Patterns sequence:  Repeats of 4 rows in each colour.


Border rows on the three straight sides:  I followed the First Row of Lucy of Attic 24 Ripple blanket except I used Sc(US) Dc(UK) stitches. The second and third rows were the same.


Border row on the bottom of the blanket     

Some tips to remember when making chevrons/ripples:

1) Count your stitches between increases and decreases .. all the time, in every row.
2) Keep your edges straight, if they are not you have not counted the stitches accurately.
3) I start with a longer chain of stitches than I need, then I count carefully when I am doing Row 1 be it scs, dcs, hdcs or trs, until I have the right stitch count.  That way if you have have lost your count doing the chains, and I do, you will not be short of chains on Row 1.  Then the extra chains can just be pulled out.  Does that make sense? I hope so!
4) When you work the first and last sts along a row, make them a little looser so that the sides of the blanket do not pull up.

Chevron and ripple blankets are relatively simply to make once you get the hang of the pattern repeats.  I enjoy rippling along immensely!

Lots of love, thanks as always for reading, Pat xxxxxxxxxxxxxx


____________________________________________

Edit add-on:  We have had the most welcome relief from the hot weather in the past few days with storms and rain almost every day, and the temperatures have dropped below 30 degrees C for the first time since September.  Glorious days and nights ... YAAAAAYYYY!


Edit add-on:  Pleeeaaassseee forgive my huge knowledge gap here;  I have gone onto Photoshop for the first time ever, and here is my very wibbly wobbly attempt to illustrate how I filled the gaps on the top of the chevrons.   If I can do a better picture, perhaps with white lines, I will put it up!


OK  .. each gap is filled in separately.  Beginning on the right side of the blanket and at the top of a zig zag on the RHS, and working in Dc(US) or Tr(UK) sts, crochet 3dc tog, then I followed the chevron pattern ~ dc x 9, dc 3 tog, dc 3 tog, dc x 9 ~ then to end work 3dc tog. Turn. 
Chain 3 - stands as first st, then dc 2 and combine with 3 chain to make your first 3dc tog ~ dc x 5, dc 3tog, dc 3 tog, dc x 5 ~ 3dc tog to end. Turn.
Chain 3 again, and combine with your following 2dc to make your first 3dc tog ~ dc x 1, dc 3 tog, dc 3 tog, dc x 1 ~ 3dc tog to end. Turn.
Chain 3 again and combine with your following 2dc to make your first 3 dc tog, 3dc tog to end. 
Now your chevron gap should be closed.  Repeat with the other gaps.

I must emphasise that I frogged my work several times,  until this little pattern looked as if it would look give me the look I wanted. I followed quite a few methods I found by Googling (what would we do without it!), but none looked OK to me.  I winged it as I went along until I found a way to make it work best for my blanket.


Sunday, 20 December 2015

My Christmas Wreath

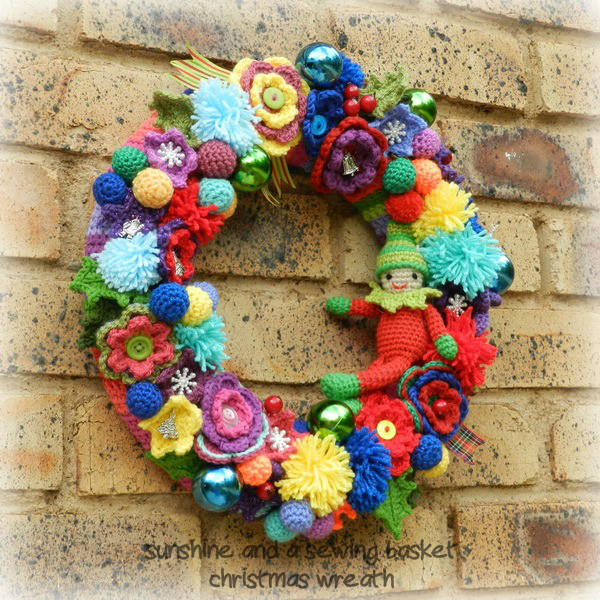
Have you ever seen a picture of something beautiful and immediately knew you had to have one just like it?  When I saw the beautiful Christmas Wreath that Lucy from Attic 24 posted last year, I was smitten! So this year I set about making one of my own. With just enough time to get all the flowers, little balls, pom-poms, little stars and jolly holly leaves made, I gathered together all the charms, ribbons, buttons and bits and bobs I had been collecting just for this project.


Then I shopped for a polystyrene wreath form ... well was I in for a let down .. none, simple not one anywhere. Not a readily available item in SA it seems.
Then my dear husband came to the rescue and went on a search for me and came upon a very nice young gent who has a florist .. he had one at home he told David, full of pink feathers from a display he had done.
He agreed to bring it in for me, I collected it and it was perfect, and he very kindly gave it to me free of charge .. so very kind! 


This is the wreath shape with it's stripey 'scarf' sewn on, joined at the back with neat stitches.  Random colours and stripes.


I added a tiny elf sort of sitting on the rim looking quite cheeky!  My first attempt at making such a little item, lots of fun, very fiddly and faffy, but I am delighted, he is very cute!  I followed this nice pattern, but had to adjust as a I went along as I used 4 ply wool and a size 2.50mm hook. My stitching is not great, much improvement needed if I make another Amigurumi figure!  Which I feel I might do, so many wonderful patterns out there!  

Anyway, here is my little elf-man!


I really enjoyed the process of placing the flowers and other adornments;  it takes a long time ...  I find it relaxing. I had made more than enough, so I could play a little.


I added charms with a festive look ~ a Christmas tree and a Santa and bells and some snowflake buttons, and ribbon tucked behind two of the bigger flowers.

Some details for your information:

Wreath ~  The yarns are varied, but mainly Stylecraft Special DK, and Elle Pure Gold DK and I used a 3.50mm hook.  I used Attic 24 patterns for the flowers (treble layer and double layer), little stars, little balls, and jolly holly.
Elf ~  The yarn is our Mirage 4 ply and I used a 2.50mm hook.  The pattern is from Kristi, called Small Christmas Elf, I added the little ruffle (mainly to hide my stitching) but it looks rather cute. 


And so here we are at the end of another year, how fast it has flown by! To all my lovely friends who have taken the time to read my blog and sometimes comment, I am so grateful for you and your friendship and look forward to seeing your names pop up now and again in 2016.

There is nothing more magical than a beautifully decorated tree no matter the size, with lights and special baubles and home made ornaments decking the halls, well maybe not halls but your favourite room! and friends and family to brighten up your festive days.  Wishing you Merry Christmas, love and blessings and peace xxx Pat


Tuesday, 1 December 2015

'Frozen' Christmas baubles

A large order has been on my crochet hook for the last several weeks ..... of such beauty I must tell you, I am knocked sideways at how the items turned out ... but ... the big reveal will take place after Christmas.  You see the items are all Christmas presents, so I cannot show you yet!

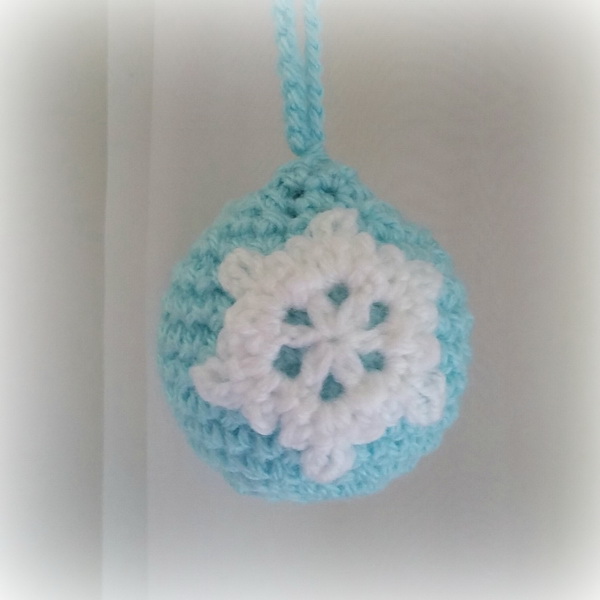
The last two days have been back to making Christmas gifts and baubles.   These I finished today, so pretty in their soft turquoise colour.


Patterns are based loosely on baubles I found here and here.  I embellished the top bauble with little white pearl beads that I sewed on once the bauble was complete.  For the second bauble I crocheted two tiny snowflakes and sewed them on.  I followed the first few rows of Annaboos House Star Ball (the first pattern link) because I liked the star shape to start off the bauble and then just winged it into a sort of lattice pattern to show off the silver bauble inside.  These are both super patterns I must add.   I made different lengths of chain st for the loops.

Details FYI ... the yarn is Stylecraft Special DK in Sherbet.  I used a size 3.50mm hook for a good close texture.  The baubles are of the plastic variety in silver, and I twisted the tops off (they were dodgy anyway) so that I could attach the loops to the actual crochet body of the bauble.

A delicate and pretty addition to my bauble collection!

As I type, the clouds have gathered and I can hear distant thunder.  We are having one of the hottest early summers that I can remember with daily temperatures mostly up in the 30's C and very little rain .... so a prayer for a nice shower later would be so appreciated. 

Thanks for reading, until next time,
Hugs Pat xxxxxx

Tuesday, 22 September 2015

Psst .... only 94 days till Christmas!


and I have indulged in some early (very) Christmas hooking. I have been quiet but I have been busy, laid low with bronchitis that I feel is not done with me yet, these cute decorations have kept me company, along with many, many cups of tea!


First up is a Christmas Star with a cheeky face, Nathan embroidered in white and two little bells to finish it off. The pattern is from Julie at Little Woolie blog, the face is a simple circle in UK Dc/US Sc, eyes are French Knots and the smile is Backstitch. This little star will be winging it's way to a sweet little boy together with his Minion beanie I made him.


These two are made from the same pattern, each finished with a shiny brassy coloured button on both sides and brass bead loops.

Next are the absolute cutest Gingerbread Men .. this sweet pattern is from Repeat Crafter Me.  I experimented with different colours of brown yarn and size hooks.  They all need loops added, and I may use red ric-rac just for something different.


I am 'hooked' on these beautiful Hearts, with roses and leaves from Lucy at Attic 24 on the purple, shiny purple and blue hearts and Jolly holly again from Attic 24 on the white heart.  I fashioned the berries as I went along, so no pattern.  There are many berry patterns on Pinterest. 


This is an easy and very sweet star from my good friend Zelna at Zooty Owl Blog.  I will be making many more of these I think.


Next up is such a cute and very popular little Christmas sock ornament, pattern from Angie at Le monde de Sucrette. I couldn't stop, once I had made one I just could not stop!!


The last ornaments are made with two circles of the same size. To see how to make circles, link to this post of mine, and follow the first three rows or so, depending on how large you want your ornament.   Crochet them together with UK Dc/US Sc almost to the end, then fill with a little wadding or what ever you have handy, even snipped off threads from your other crochet projects will do.  Complete closing the circles remembering to add a little hanging loop, and then decorate with holly or beads or whatever takes your fancy.


Pinterest is a gold mine of crochet Christmas ornaments and decorations.  Check out my board Christmas Handmade for more super ideas.

I am filling an order for three blankets for a good friend now, so the red, white and green yarn is packed away for a little while!  More on these projects later!

Thank you for joining me, till next time,
love to all xxxxxxxxx Pat


Wednesday, 16 September 2015

Richard's C2C cushion

My first C2C project and it was such fun! Surely one of the easiest patterns once you get the hang of it, works up super fast, and is so pleasing to the eye!  

In this post last year, are pictures of the Ripple Blanket I made for my youngest son Richard for his 30th birthday.  It is quite fabulous, the colours blending so well.  So when his birthday approached this year, I looked at the left over yarn, and not long after this cushion cover was on my hook! The colours for the blanket and cushion cover were not chosen intentionally with Fall or Autumn in mind ... they were the colours chosen by my son.  However, the browns and tans and golds do rather fit in well with an Autumn theme, cosy and warm.  The yarn is a local Double Knit, and I used double thread throughout and a size 7mm hook. It is plump, soft and comfy, and he loves it!  


It is about 600mm square, with a nice linen inner cushion pad with Hollowfil filling, so that the cover can be removed and washed.


There are some excellent tutorials for the Corner to Corner pattern; I used The Crochet Crowd YouTube pattern, just to get the general idea.  This pattern is also a good one. Felted Button also has a super Ravelry download tutorial.
I crocheted two squares measuring exactly the same number of stitches and rows, and stitched the squares together by hand around three sides.  The last side I left open, and finished off with a row of UK Treble (US Double) crochet right around.  Then the buttons went on next ... This post by Lucy of Attic 24 shows in clearer detail (my pics are in browns and not that sharp) how to go about attaching the buttons.  One set of buttons is on the inside of one square, so that they can button through the row and show on the outside.  

Then I added another different set of buttons, a button sewn onto the reverse side of each of the first set of buttons.  Now the cushion has buttons on both sides and can be used either which way up!

My picture below might clear up any confusion! 


One side has slightly different colours to the other, with the buttons matching the appropriate sides.  The photos were very unco-operative, just refused to match up in colours!! Some are darker, some lighter, I have a lot to learn in the photo editing department it would appear! Most frustrating!

Below is the gorgeous Ripple Blanket, so proud of it.


Spring is upon us here in South Africa, such a amazing time of the year with a long awaited thunder storm and lovely rain a weekend or two ago ...  I have a strawberry or two on my new plant, my lemon tree is groaning with new fruit, and the scent as you walk under the tree is too sublime! 

Thank you for reading lovely friends, much love till next time 
Pat xxxxxxxxx