Showing posts with label Christmas. Show all posts

Friday, 1 December 2017

Christmas bauble


A beautiful Christmas Bauble, quick and easy, to add to your Christmas Handmade bauble collection.  Hope your decorations will look Tree-mendous! 

Materials
Cotton or yarn in 4ply/sports weight, small amounts in desired colours
Narrow ribbon, optional
4mm hook, or hook appropriate for yarn
Darning Needle
Scissors
75mm polystyrene bauble, or size of choice


Notes
Pattern is in US terms
Crochet 2 sections
Ensure your loose threads are securely tied off.


Tension and Bauble Size
I have quite an even tension .. not too tight or too loose. I
t's a good idea to fit your crochet  as you go along, you want a nice snug fit with a little gap in between the halves on the bauble, which you will pull together as you stitch the two sections together at the end. 
Also ensure you have the same number of stitches on each half when you finish.  

Stitches and abbreviations used
Sp~ space
St ~ stitch
Sl st ~ slip stitch
Ch-3 ~ stands for 1st or beginning dc
Dc ~ double crochet (US) treble crochet (UK)

Special stitches
2dc cluster ~ Yarn over, insert hook in sp, yarn over, pull through st, yarn over, pull through 2 loops on hook, yarn over, insert hook in same sp, yarn over, pull through stitch, yarn over, pull through 2 loops on hook, yarn over, pull through all 3 loops on hook, ch 1.

Fp3dctog cluster US / Fp3trctog UK ~ 1dc/trc into space indicated pulling yarn through first 2 loops only (2 loops on hook), yarn over, insert your hook front-to-back through your work, so that the 2dc/trc cluster you want to crochet around is in front of your hook. Yarn over again and pull through yarn, yarn over and pull yarn through 2 loops ~ three loops on your hook. 1dc/trc in next space, pulling yarn through first 2 loops only ~ 4 loops on hook. Yarn over, pull yarn through all 4 sts on hook, ch-1 to close.

Fpsc / Fpdc ~ Front post single/double crochet. Insert your hook front-to-back through your work, so that the Fp3dctog/Fp3trctog cluster you want to crochet around is in front of your hook.  Yarn over, draw loop through both spaces.  Yarn over and draw loop through both remaining 2 loops on hook

Here we go!

Row 1
Magic circle or ch-4, 15 dc into 1st chain st, sl st into 4th chain, cut thread about 10cm long and secure well ~ 16 dc


Row 2
Join new colour yarn to any space between dcs. Starting cluster - Ch-3, 1dc into same space, Ch-1 to close. 2dc cluster (refer to special stitches above) into following 15 spaces between dcs from Row 1. Sl st into 3rd of ch-3 ~ 16 x 2dc clusters


Row 3
Join new colour yarn to any closing ch-1 space, ch-3, Fpdc (see Special Stitches above) around 2dc cluster from Row 2 and keeping last stitch on hook, 1dc into next space keeping stitch on hook. You should have three stitches on your hook. Yarn over and pull loop through all three stitches.  Ch-1 to close.  *Working over last and next spaces, crochet Fp3dctog cluster* Rpt * to * 14 times more.   Sl St into closing ch-1 of 1st Fpdc cluster ~ 16 x Fpdctog clusters.


First Fp3dctog cluster completed, and second cluster completed as far as 3 loops on hook plus closing chain from first cluster. 


Row 3 complete


Row 4
Repeat Row 3


Row 4 showing closing chain loop and three loops of Fp3dctog on hook
Continue repeating Row 3, until you have sufficient rows to cover half the bauble minus about 1cm.

  Finishing Row ~ sc into each stitch around
 First half complete. Make the second half

Joining the two halves
Tread a long length of yarn into your
darning needle. Sew through a few 
stitches on the wrong side of first 
section, making sure your joining 
thread is secure.  
Whip stitch two sections together 
neatly, pulling your work over the 
bauble as your go. 
When you have stitched both sections 
together, secure the end of the join 
with a two or three back stitches. 
Insert your hook under the back 
stitches and pull a loop of yarn
through. 
Now chain a length of stitches, 
long enough to double back to form a
string of chains to hang the bauble.  
Secure the finished chain neatly to the
starting point.


Some more baubles!  I used 12 dc into the magic ring for a small white bauble of 50mm. and I made it up in one piece, although it was a bit tricky for the last two rows, decreasing the number of dc.


And the pattern as is, but with a 5mm hook for two baubles of 75mm, with white ribbon threaded through joining whip stitches instead of making a loop of chains.

Hope you have as much fun as I did, 
warning,
Handmade Christmas Baubles are
ADDICTIVE!!!


Thursday, 16 March 2017

Life is what happens ..........


So goes John Lennon's familiar quote,  "Life is what happens while you are busy making other plans".  And so I found myself planning many new projects in the last few months, and instead life happened.   An unsettling time, a trip abroad, a wedding, a daughter in law joins the family, a spell of ill health, a heat wave or two, Christmas, a grandson goes off to boarding school, and a daughter returns home and leaves again!

Taking deep breaths right now, wishing for lovely cool rainy days ... it has been soo hot, not crochet or working with yarn ideal at all.

Ok First up .... my son's wedding.  He lives in Guildford, I love it there!


This is their engagement photo .. two beautiful special people. Sam is from Milano, my son is South African, but living in England now.


And after the ceremony ~ Mr and Mrs!


It was a lovely wedding, dancing and delicious food, happy people and warm feelings! I was so fortunate to share this wonderful day with my beloved friend Wendy, we have been friends for 54 years, it was a memorable occasion! I spent a week staying with her and the family, catching up on old times, the best of times!  Then I spent a week with the newlyweds, getting to know my new daughter-in-law Samantha, and sharing a wonderful few days with my son.  We spent a day in Dorset, trawling the many antique shops.  And to my delight I discovered Gilliangladrag Fluffatorium.  Oh my word what a delight that little shop is .. just a riot of colour, and the nicest ladies on hand to help. 


A day in London was fabulous, a walk along the South Bank, all the way to the super Borough Market.  A stop to take a photo of the South African flag fluttering above South Africa house, oh and by the weather was superb for almost the duration of my visit, the sunshine and mostly blue skies almost every day of the seventeen days I was there ...   So lucky was I!!


I was based in the Guildford/Woking area .. I loved how easy it was for me to catch a bus or the train, and how safe I felt.  Remember I live in Johannesburg South Africa, which is my home town and I love where I live .. but it is known to be a dangerous city as well. I loved Guildford's cobbled high street, with little alleys leading off it and super small shops offering everything from smart boutiques to veggies and pies, to M&S and the market which I adored.  Here is my son standing on the cobbled road with the clock in the distance. I also enjoyed the buskers, very good some of them are.  


We all travelled over to this old pub and met up with my husband's beautiful daughter Sarah, and the lunch we had was amazing with the biggest Yorkshire puds I have ever seen, virtually the size of my plate!


All too soon I had to board my flight for home.  A wonderful trip, but a husband and little doggie both of whom I missed so much waiting for me.

Through November and December we had such unbearably hot weather, it made working with yarn well nigh impossible.  And added to that I had a spell of ill health, so not much to report there.  Christmas was quiet spent with family.  I did manage to make a couple of small festive items, gifts for little people!


During the month I was away for the wedding, and through November and December, my daughter, my eldest, was in a relationship that was not good.  Suffice to say we were all worried as to her future, how safe she was, and how it would all pan out.  When your child is in her forties, divorced with two almost grown children, it is not the easiest thing to be supportive, at the same time be fearful, at the same time try to give sound advice, and also to not be seen to be interfering.  Eventually common sense prevailed and we persuaded her to move back home, to our great relief.  It was very difficult for her, she has the biggest heart and saw her role with the gentleman involved, as carer and saviour .. said gentleman has addiction issues ..  
I am happy to say that the relationship ended, did not end well, but she knew it was the best move. And I can also say I do believe in miracles!  She has met, purely in an accidental sort of fashion, a most wonderful man, kind, generous, decent, no issues, who adores her.  She is happier than I have seen her in a year .. and I am over the moon for her.  Here she is looking gorgeous in her best colour!


And within all this turmoil, my youngest grandson, my daughter's youngest son left home for boarding school.  This was a huge move for Riley, and a wrench for his mom and me and the family.  So far all is good, the school is in a beautiful part of the country, with an emphasis on outdoor activities like canoeing, river rafting, hiking, off road biking and the like, as well as the usual sports like rugby and cricket.  Here he is ... Action Man .. Cool!


 I have been making up the most gorgeous Fingerless Mitts .. a paid-for pattern by Elvira Jane Crochet Design. They make up superfast, a lovely textured pattern, I love them! 


And I tried a couple of Katniss Messy Bun Beanies ... also fun to make ... 


And so that sort of covers the months since I last posted .. really hoping for some calm now .. I need it 😂
Till next time, thank you for reading xxxxxxxxx Pat


Sunday, 20 December 2015

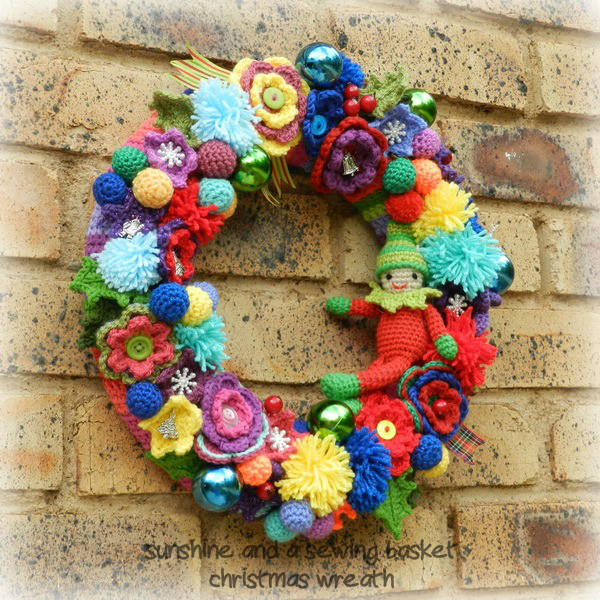
My Christmas Wreath

Have you ever seen a picture of something beautiful and immediately knew you had to have one just like it?  When I saw the beautiful Christmas Wreath that Lucy from Attic 24 posted last year, I was smitten! So this year I set about making one of my own. With just enough time to get all the flowers, little balls, pom-poms, little stars and jolly holly leaves made, I gathered together all the charms, ribbons, buttons and bits and bobs I had been collecting just for this project.


Then I shopped for a polystyrene wreath form ... well was I in for a let down .. none, simple not one anywhere. Not a readily available item in SA it seems.
Then my dear husband came to the rescue and went on a search for me and came upon a very nice young gent who has a florist .. he had one at home he told David, full of pink feathers from a display he had done.
He agreed to bring it in for me, I collected it and it was perfect, and he very kindly gave it to me free of charge .. so very kind! 


This is the wreath shape with it's stripey 'scarf' sewn on, joined at the back with neat stitches.  Random colours and stripes.


I added a tiny elf sort of sitting on the rim looking quite cheeky!  My first attempt at making such a little item, lots of fun, very fiddly and faffy, but I am delighted, he is very cute!  I followed this nice pattern, but had to adjust as a I went along as I used 4 ply wool and a size 2.50mm hook. My stitching is not great, much improvement needed if I make another Amigurumi figure!  Which I feel I might do, so many wonderful patterns out there!  

Anyway, here is my little elf-man!


I really enjoyed the process of placing the flowers and other adornments;  it takes a long time ...  I find it relaxing. I had made more than enough, so I could play a little.


I added charms with a festive look ~ a Christmas tree and a Santa and bells and some snowflake buttons, and ribbon tucked behind two of the bigger flowers.

Some details for your information:

Wreath ~  The yarns are varied, but mainly Stylecraft Special DK, and Elle Pure Gold DK and I used a 3.50mm hook.  I used Attic 24 patterns for the flowers (treble layer and double layer), little stars, little balls, and jolly holly.
Elf ~  The yarn is our Mirage 4 ply and I used a 2.50mm hook.  The pattern is from Kristi, called Small Christmas Elf, I added the little ruffle (mainly to hide my stitching) but it looks rather cute. 


And so here we are at the end of another year, how fast it has flown by! To all my lovely friends who have taken the time to read my blog and sometimes comment, I am so grateful for you and your friendship and look forward to seeing your names pop up now and again in 2016.

There is nothing more magical than a beautifully decorated tree no matter the size, with lights and special baubles and home made ornaments decking the halls, well maybe not halls but your favourite room! and friends and family to brighten up your festive days.  Wishing you Merry Christmas, love and blessings and peace xxx Pat


Tuesday, 1 December 2015

'Frozen' Christmas baubles

A large order has been on my crochet hook for the last several weeks ..... of such beauty I must tell you, I am knocked sideways at how the items turned out ... but ... the big reveal will take place after Christmas.  You see the items are all Christmas presents, so I cannot show you yet!

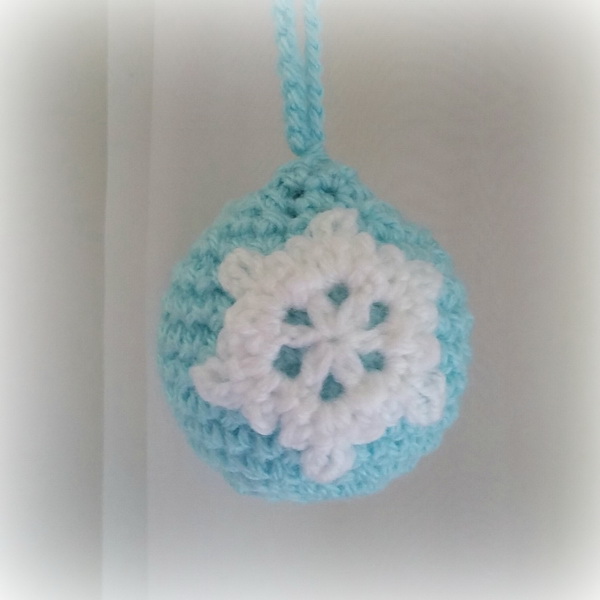
The last two days have been back to making Christmas gifts and baubles.   These I finished today, so pretty in their soft turquoise colour.


Patterns are based loosely on baubles I found here and here.  I embellished the top bauble with little white pearl beads that I sewed on once the bauble was complete.  For the second bauble I crocheted two tiny snowflakes and sewed them on.  I followed the first few rows of Annaboos House Star Ball (the first pattern link) because I liked the star shape to start off the bauble and then just winged it into a sort of lattice pattern to show off the silver bauble inside.  These are both super patterns I must add.   I made different lengths of chain st for the loops.

Details FYI ... the yarn is Stylecraft Special DK in Sherbet.  I used a size 3.50mm hook for a good close texture.  The baubles are of the plastic variety in silver, and I twisted the tops off (they were dodgy anyway) so that I could attach the loops to the actual crochet body of the bauble.

A delicate and pretty addition to my bauble collection!

As I type, the clouds have gathered and I can hear distant thunder.  We are having one of the hottest early summers that I can remember with daily temperatures mostly up in the 30's C and very little rain .... so a prayer for a nice shower later would be so appreciated. 

Thanks for reading, until next time,
Hugs Pat xxxxxx

Monday, 8 December 2014

Old Brand New

Baubles .... old brand new!!


Several of my beloved mom's Christmas decorations have lovingly been cosied in the softest cloth for years in my Christmas boxes ... so many fond memories of my sister and I as just little tots watching my mom decorating our tree ♥ love you mom ♥

A lovely post by The Patchwork Heart inspired me to transform these really old baubles and I love how they look!

So easy, and quick too .. and I am so happy now that the baubles that have been in my life for soooo many years, now look right up to date for many years more.


Have a wonderful week ..
Lots of love 
Pat xxxxxxxx

Wednesday, 3 December 2014

Merry Christmas Throw


♥Wow♥ .... I am delighted with my Merry Christmas Throw. I participated in The Blog Hop CAL with some very talented craftswomen each designing some beautiful squares.   It is so very hot here in Johannesburg during our Festive Season, I knew I wanted to make a statement blanket, not 'cuddle me and keep me warm' blanket, so the idea came to me to make a Christmas theme throw.  Not too big, just enough to make a pop of Christmas colour. And jolly jingle bells!!! this throw does make a huge pop of beautiful, traditional colour in red, white and green!! Makes my very neutral colour, all time favourite chair take centre stage!!!


The throw consists of twelve squares of about 9.5" / 24cm each, and the border is one of my current go-to patterns, the Block St.  To finish off with a merry flourish, I used a Braid edging.


The following pictures show how I have joined the squares. Sometimes, as in the CAL featured here, squares are made up and often will have an different stitch count per square. To overcome this and to join the squares easily and attractively, this is the way I do it:

First I choose the square with the easiest stitch count on which to base the consequent squares.  I chose a traditional Granny square.

*I edged the square with the two rows which constitute the basic two rows of the Block st, i.e. 1sc, 3ch, skip 2/3 sts, 1sc;  all around the square, and then three dc into each 3ch loop.  

*Around the second square, work the first row of the Block st, and as you work along you need to make sure you have the exact same number of 3ch loops as your first square.  If you look carefully at the pictures below, you will see that I have gaps of three stitches and four stitches between the single crochet stitches, worked across the side of the square evenly, so that at the end of the row there are the same number of 3ch loops as the first square.  The corners are 2sc, 2ch 2sc, into the corner spaces in the first of the Block St and 2dc, 2ch 2dc in the second row.  I used the 'join-as-you-go' principle to join the squares. 

*Dedri from Look at what I Made blog, has a very good tutorial on joining squares with different stitch counts, you may like to take a look here as well.


These are a some of the pretty squares ...


Thank you for reading and 
happy hooking!
Pat xxxxxx