Showing posts with label crochet. Show all posts

Saturday, 13 October 2018

A precious new arrival

This has been a joyous and somewhat emotional year so far!

My precious and long-awaited granddaughter decided to join us early. She was born at 25 1/2 weeks at the Queen Alexandra Hospital in Cosham Portsmouth in late August.  Early on a Monday morning, my son phoned me and whispered in a wibbly wobbly voice "she's here Mom, she's here". On a happy note, our little miracle is making wonderful progress.  She is now at a hospital closer to home in Guildford, a month has passed and I am a Granny-in-Love! I see photos of her almost every day, dear Samantha her mom has been so kind in that respect. Living in South Africa means I am so very far away.  

I had started two baby blankets, and was in the planning stages of what cardi's and jerseys to make ... suddenly, Skylar Alessia decided to come out and play, and I was propelled into a jersey making, sock knitting, hat crocheting frenzy! 

Jerseys, jackets, socks and hats galore are soon to be on their way, in readiness for her homecoming in December. Here is what I have made so far:


This is a super-quick blanket pattern called 6-Day Kid Blanket, from 
Betty McKnit

 A firm favourite now, the C2C Gingham Blanket, all the info on how to make this super pattern can be found on The Patchwork Heart Blog

 I made this simple Granny Square blanket some time ago,
Turquoise is Skylar's mom Sam's favourite colour!

 So very sweet, so very quick .. Bitty Baby Booties from 
smallfriendly.com

 A Jester hat new-born size, pattern info at carewear.org
and two pairs of teeny socks, following the First Size Sock pattern
 on Winwick Mom Sockalong Face Book Page, it's in the Files 

 And another pair!

I loved making this cardi.. its called Hundreds, designer is Kelly van Niekerk,
PekaPeka Design Studio.  She has some lovely patterns, both free and paid,
look for her on Ravelry

 Such a fun little garment, pattern is free, called All-in-One Baby Top from Marianna's
Lazy Daisy Days.

 I have made this beautiful cardi so many times, the pattern
book has lost its cover I think its at lease twenty years old.
Every baby that has been born into my family has had one of these.
The yoke is delicately detailed, as it gathers in towards the neckline ... 
I am thinking perhaps I will post the pattern, taking no credit, I would love
to share it!

 Another favourite, Zooty Owl's Quick and Easy Baby Cardigan, so easy to make,
I added pretty turquoise buttons with little white flowers in the centre.
I am quite particular when selecting buttons for my projects,
it's important to choose just the right buttons!

 Isn't this too sweet? I had yarn over from the Granny Square blanket
pictured above, just enough to make up my dear friend Zelna Olivier's
Newborn Baby Body Warmer.  Pattern can be found on her Ravelry page.

 Another Quick and Easy Baby Cardigan from Zooty Owl, paired with
my Layla-lu Baby Beanie, pattern on the blog. This time I added a 
cheeky pompom!
    And finally, two little premmie/newborn jackets.  The pattern is called
Nessa's Sweater and can be found on kimations.blogspot.com.  I especially like
the picot detail on all the edging.
The hat is my Layla-lu beanie pattern
 
This version is made with plain sleeves, and 'ombre' buttons ...
hahaha .. in other words a very pale pink one at the top, pale pink one 
in the middle and a pink one at the bottom!!

I work on a rather old laptop, which I might add still does what I need just fine, BUT oh my word the photo editing apps on our new smart phones/notebooks etc are just too amazing, hence the higgledy piggledy array of different photo styles .. please excuse the mish mash!

An aside if I may ... just googled Higgledy Piggledy, do you know this poem by Ogden Nash?

"Higgledly piggledy, my black hen,
She lays eggs for gentlemen.
Gentlemen come every day
To count what my black hen doth lay.
If perchance she lays too many,
They fine my hen a pretty penny;
If perchance she fails to lay,
The gentlemen a bonus pay"

It's quite long and does not have anything to do with a pig!  When Skylar Alessia is introduced to social media, as I am sure her mommy will want to show to the world her beautiful miracle baby, I will post a picture or two.

Have a most wonderful day,
love to you all Pat xxxxxxxxxxxxx


Saturday, 27 January 2018

Ross Poldark Blanket

Last year, a beloved friend sent me a message, it went something like this: " Patti, if you would be so kind, I would love it if you could make a blanket for Robert, he keeps on taking mine!" They live in Woking UK, and it can get veery chilly not so!!! Some years back I made her this blanket, a very beautiful blanket designed by Heather of The Patchwork Heart.  The Demelza and Poldark CAL's had taken my fancy when they were posted, and at the time I was quite keen to get involved ..   (the series is amazing too). So I leapt at the the opportunity, and since I needed a blanket for a gentleman, the Poldark pattern was ideal. 

It is definitely not for the faint hearted this pattern is .... some skill is really necessary.  I learnt so much, and when it was finished, it was fabulous!  There are many overlay stitches ... new technique for me.  Also small and large squares, I enjoyed the overall experience immensely.  I used my own colour pallette, with some colours as in the pattern, and some my own choice. I also changed the square placements a little. And I decided on a plain border.  Here are a few details:

Pattern:  Ross Poldark blanket designed by Catherine Bligh
Yarn: Stylecraft Special DK
Hook: 4.50mm
Colours:  Black, white, sage, storm blue, silver, and copper

And a picture or three .......


The blanket was finished in November, in time for a visiting friend to South Africa to take it back to the UK with him.  And then it was wrapped in time for Christmas.  Robert is sent me his gratitude and thanks for his blankie, which he absolutely loves .. happy days!!!!  There is something so amazing about handmade gifts isn't there.

Thank you for the most wonderful support, lovely ladies, and until next time
much love Pat xxxxxxxxxxxxx

Tuesday, 12 January 2016

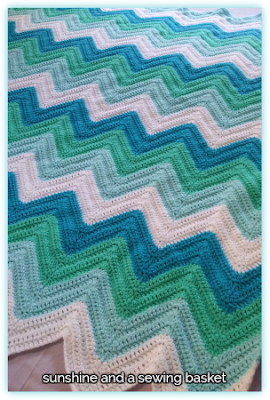
Chevron blankets times 3!


There is an immense sense of delight, pride, accomplishment of purpose and satisfaction when looking at a finished project and one can say "Well done". I said that to myself near the end of November last year, when I set about carefully folding and wrapping a parcel of soft, beautiful blankets.

Early September and with Spring just around the corner! My dear friend in the UK and I started chatting on Messenger about blankets, crochet blankets! And how she finds her granddaughters are very partial to the throw I made her!! And so it came about that we decided I would make her three blankets and send them along with her sister-in-law who was visiting in December. Within a few days we had a plan, we decided on a pattern and colour palettes and next stop was my local specialist yarn shop. The brief .... three granddaughters, three blankets in different colours and using the Chic Chevron Blanket by Red Heart.

Came November, the blankets were done! My sense of achievement was enormous .. I had two bad bouts of bronchitis and we had enduring heatwave conditions through the weeks, and can I tell you, it is so challenging to work with yarn when the temperatures are hitting 32-33 degrees C every day! Buuuut ..... this is what I did;  firstly made sure I was outside on our deck in the cool of the early morning .. the kettle was on at 4:45am some mornings! Secondly as the day progressed I sat with a fan on, ice water to drink on hand, and a near dripping wet face cloth close by that I used constantly to wipe my hands, and drape around my neck and shoulders, the coolness of the icy cold cloth was very refreshing! And lastly I do keep I small bottle of baby talc on hand to shake on my hands to keep them dry!  Now this might all seem a bit extreme, but if you are living in the Southern Hemisphere i.e. South Africa or Australia and no doubt some other countries south of the equator too, we are experiencing the very worst that the current El Nino episode can throw at us. Beastly hot weather, no rain, dusty winds, so hot at night one cannot sleep .. just too awful.

Anyway, back to the blankets. We called the project "The Secret Santa Project" aptly named because the girls and indeed the whole family had no idea they were getting the blankets for Christmas from their Grandma!  Only a necessary handful of folk knew about the project .. right up to Christmas Day when they opened their gifts! The anticipation was delicious! And happily the girls were utterly surprised and quite delighted!

Some details:
First up is the blanket in colours of White, Black, Plum, Emperor Purple, and Parma Violet. Pattern sequence:  4 rows each of White, Emperor Purple and Black and 3 rows each of Plum and Parma Violet.


Second up is the blanket in colours of Sherbet, Aqua, White and Pomegranate. Stripe sequence: Repeats of 4 rows of each colour, then 2 rows of each colour.


Third up is the blanket in colours of White, Sherbet, and Aqua and Aspen. Patterns sequence:  Repeats of 4 rows in each colour.


Border rows on the three straight sides:  I followed the First Row of Lucy of Attic 24 Ripple blanket except I used Sc(US) Dc(UK) stitches. The second and third rows were the same.


Border row on the bottom of the blanket     

Some tips to remember when making chevrons/ripples:

1) Count your stitches between increases and decreases .. all the time, in every row.
2) Keep your edges straight, if they are not you have not counted the stitches accurately.
3) I start with a longer chain of stitches than I need, then I count carefully when I am doing Row 1 be it scs, dcs, hdcs or trs, until I have the right stitch count.  That way if you have have lost your count doing the chains, and I do, you will not be short of chains on Row 1.  Then the extra chains can just be pulled out.  Does that make sense? I hope so!
4) When you work the first and last sts along a row, make them a little looser so that the sides of the blanket do not pull up.

Chevron and ripple blankets are relatively simply to make once you get the hang of the pattern repeats.  I enjoy rippling along immensely!

Lots of love, thanks as always for reading, Pat xxxxxxxxxxxxxx


____________________________________________

Edit add-on:  We have had the most welcome relief from the hot weather in the past few days with storms and rain almost every day, and the temperatures have dropped below 30 degrees C for the first time since September.  Glorious days and nights ... YAAAAAYYYY!


Edit add-on:  Pleeeaaassseee forgive my huge knowledge gap here;  I have gone onto Photoshop for the first time ever, and here is my very wibbly wobbly attempt to illustrate how I filled the gaps on the top of the chevrons.   If I can do a better picture, perhaps with white lines, I will put it up!


OK  .. each gap is filled in separately.  Beginning on the right side of the blanket and at the top of a zig zag on the RHS, and working in Dc(US) or Tr(UK) sts, crochet 3dc tog, then I followed the chevron pattern ~ dc x 9, dc 3 tog, dc 3 tog, dc x 9 ~ then to end work 3dc tog. Turn. 
Chain 3 - stands as first st, then dc 2 and combine with 3 chain to make your first 3dc tog ~ dc x 5, dc 3tog, dc 3 tog, dc x 5 ~ 3dc tog to end. Turn.
Chain 3 again, and combine with your following 2dc to make your first 3dc tog ~ dc x 1, dc 3 tog, dc 3 tog, dc x 1 ~ 3dc tog to end. Turn.
Chain 3 again and combine with your following 2dc to make your first 3 dc tog, 3dc tog to end. 
Now your chevron gap should be closed.  Repeat with the other gaps.

I must emphasise that I frogged my work several times,  until this little pattern looked as if it would look give me the look I wanted. I followed quite a few methods I found by Googling (what would we do without it!), but none looked OK to me.  I winged it as I went along until I found a way to make it work best for my blanket.


Friday, 31 July 2015

Flowers for Memories ~


Yarndale 2015 ... and this year the call has gone out for ...
F L O W E R S
 an abundance of colour translated into flowers of all shapes and in any discipline of yarn art, be it knitting or crochet, with pretty embellishments if you feel so inclined ... what a glorious brief!!

Since the early days of my crochet journey, when I discovered the joy of making beanies and hats, I have had a love affair with crocheting flowers to add to sweet little creations for girls;  hats with huge flowers or a posy of small flowers with dainty beadwork in the centres adorning their brims.  And then I started making tea cosies, and my word, I had such fun decorating them with gorgeous arrangements on the tops!  Headbands and earwarmers, bookmarks and handbag handles, they all got the floral treatment;  great for stashbusting too!

And a beautiful blanket, designed by Heather of The Patchwork Heart ..... my blanket was made as a gift for a very dear friend.


So imagine my delight when I read that this year the theme would be ..... flowers!  Without ado I scoured my files and folders for my favourite patterns ..... a goldmine of fabulous and easy and free patterns can be found on Pinterest ....... some of my favourite bloggers have designed lovely flowers too.


This is the method I use to neaten off the back and attach a clasp or pin, should you want to use the flower or posy as a brooch.

Position your leaf or leaves if any on the back of the flower and stitch on neatly using the tail on each leaf.

Now using either a colour from your flower, or the colour of your leaf
crochet a little three to four round circle, depending on how much you need to cover in the way of stitching and threads.
You need to have a +- 15 cm tail at the start of either your magic circle (or preferred method) which needs to be on the right side of the patch,
and a longer tail at the end.


Using the tail in the centre of the patch, 
stitch your pin neatly and securely, 
take the thread to the back of the patch and secure.

Position the patch on the back of the flower, making sure that all your stitchery is neatly covered ... and sew in place with the long tail you have left
on your last row of the patch.


A good idea is to pin the flower to yourself with a straight pin .. taking care not to injure yourself.  You may need to position the clasp a little higher than the centre
so that the flower doesn't flop forward if pinned to a garment 

Here are some of the patterns I have used ~


Autumn Berry Flower


Hellibore bloom


Coiled Roses


Five Petal Tropical Flower


Triple Layer Flower
attic24.typepad.com/weblog/triple-layer-flower.html


Pretty flower


May Roses


I hope you have as much fun creating beautiful flowers as I did .... they will be winging their way to Skipton in the next day or two! 

Local Skipton crochet artist Sheila Metcalfe raises funds on behalf of the Alzheimers Society. Flowers for Memories, sure to be an amazing display of crochet flowers, will no doubt be a huge draw at this year's Yarndale show and at the same time add much needed funds for her most worthy cause. 
Here is her postal address to which to send your
floral contributions!

Sheila's Flowers
Box 97 Skipton
North Yorkshire
BD23 9EN
England UK

The due date is September 11 ~
more details re size etc can be found on
the Yarndale Blog


Have a most wonderful weekend
Much love Pat


Tuesday, 13 January 2015

Stripey Blanket 2015 - Part 1


Ever since first seeing the beautiful and different As-we-go- Stripey blankets on Pinterest and while blog-browsing, I knew I wanted to make one just for me!

So as 2014 came to a close and I finished my Blissful Mood Blanket I started thinking about what to make for my 2015 12-month project.  I have collected several glorious colours of Stylecraft Special DK, a yarn I really like .. it came to me that I could work small amounts of this yarn at a time into stripes of patterns and make a Stripey-as-you-go Blanket over the early months of 2015.
The colours I am working with are:

Plum : Spring Green : Shrimp : Wisteria : Saffron : Magenta : Meadow : Fondant : Pomegranate : Bluebell and Aspen
Hook:  4mm
Terms:  US terms are used
I am aiming at an approximate width of 1.2m before the border.  I started with 201 ch.  I simply measured my chain row with a Tape Measure till it measured about 1.2m.  

These are my first 16 rows:

Rows 1 - 3 : Hdc in Bluebell, Pomegranate and Meadow
Rows 3 - 5 : Granny pattern in Fondant and Saffron
Rows 5 - 9 : Hdc in Plum, Wisteria and Plum
Rows 10 - 13 :  A Zig Zag pattern in Aspen and Shrimp
Rows 14 - 16 : Hdc in Magenta, Saffron and Magenta


One small detail to be aware of ... I was so keen to start .. I did my chain row and was whizzing along, only to realise after a bit that there is a right and a wrong side ...  of course!! I can be such a Dozy Doris sometimes!!  So to have my Zig Zag pattern on the right side would mean my starting Hdc row would be 'wrong-side-up'  Not to worry .. I am just being much more careful now, and making sure to plan each next section.

Inspiration comes in bucket loads from these two lovely blogs Not Your Average Crochet  and Little Woolie, beautiful examples of this blanket and wonderful photo tutorials and patterns to help you along.  I am using them as my references. I hope I can keep this project going over a few months!! my fingers are itching to get going again right now! I am loving it soooo much!
If I can, and I say that not lightly because I am still a little technically challenged, I will try and keep all my progress blogs in this one place .. any assistance will be greatfully accepted :)
Happy crocheting
happy days
love Pat xxxxx

Edit:  I will add a "Stripey as you go" label to each post, and that should keep the progress posts running sequentially .. I hope!

Monday, 8 December 2014

Old Brand New

Baubles .... old brand new!!


Several of my beloved mom's Christmas decorations have lovingly been cosied in the softest cloth for years in my Christmas boxes ... so many fond memories of my sister and I as just little tots watching my mom decorating our tree ♥ love you mom ♥

A lovely post by The Patchwork Heart inspired me to transform these really old baubles and I love how they look!

So easy, and quick too .. and I am so happy now that the baubles that have been in my life for soooo many years, now look right up to date for many years more.


Have a wonderful week ..
Lots of love 
Pat xxxxxxxx