
Layla-Lu Beanie

Pattern info:
- US Terms :: A conversion table is available here for UK terminology
- Yarn ~ I used a thicker rather than thinner DK yarn
- Hook ~ 4mm
- Stitches used ~ dc :: double crochet; sc :: single crochet; Sdc :: standing double crochet
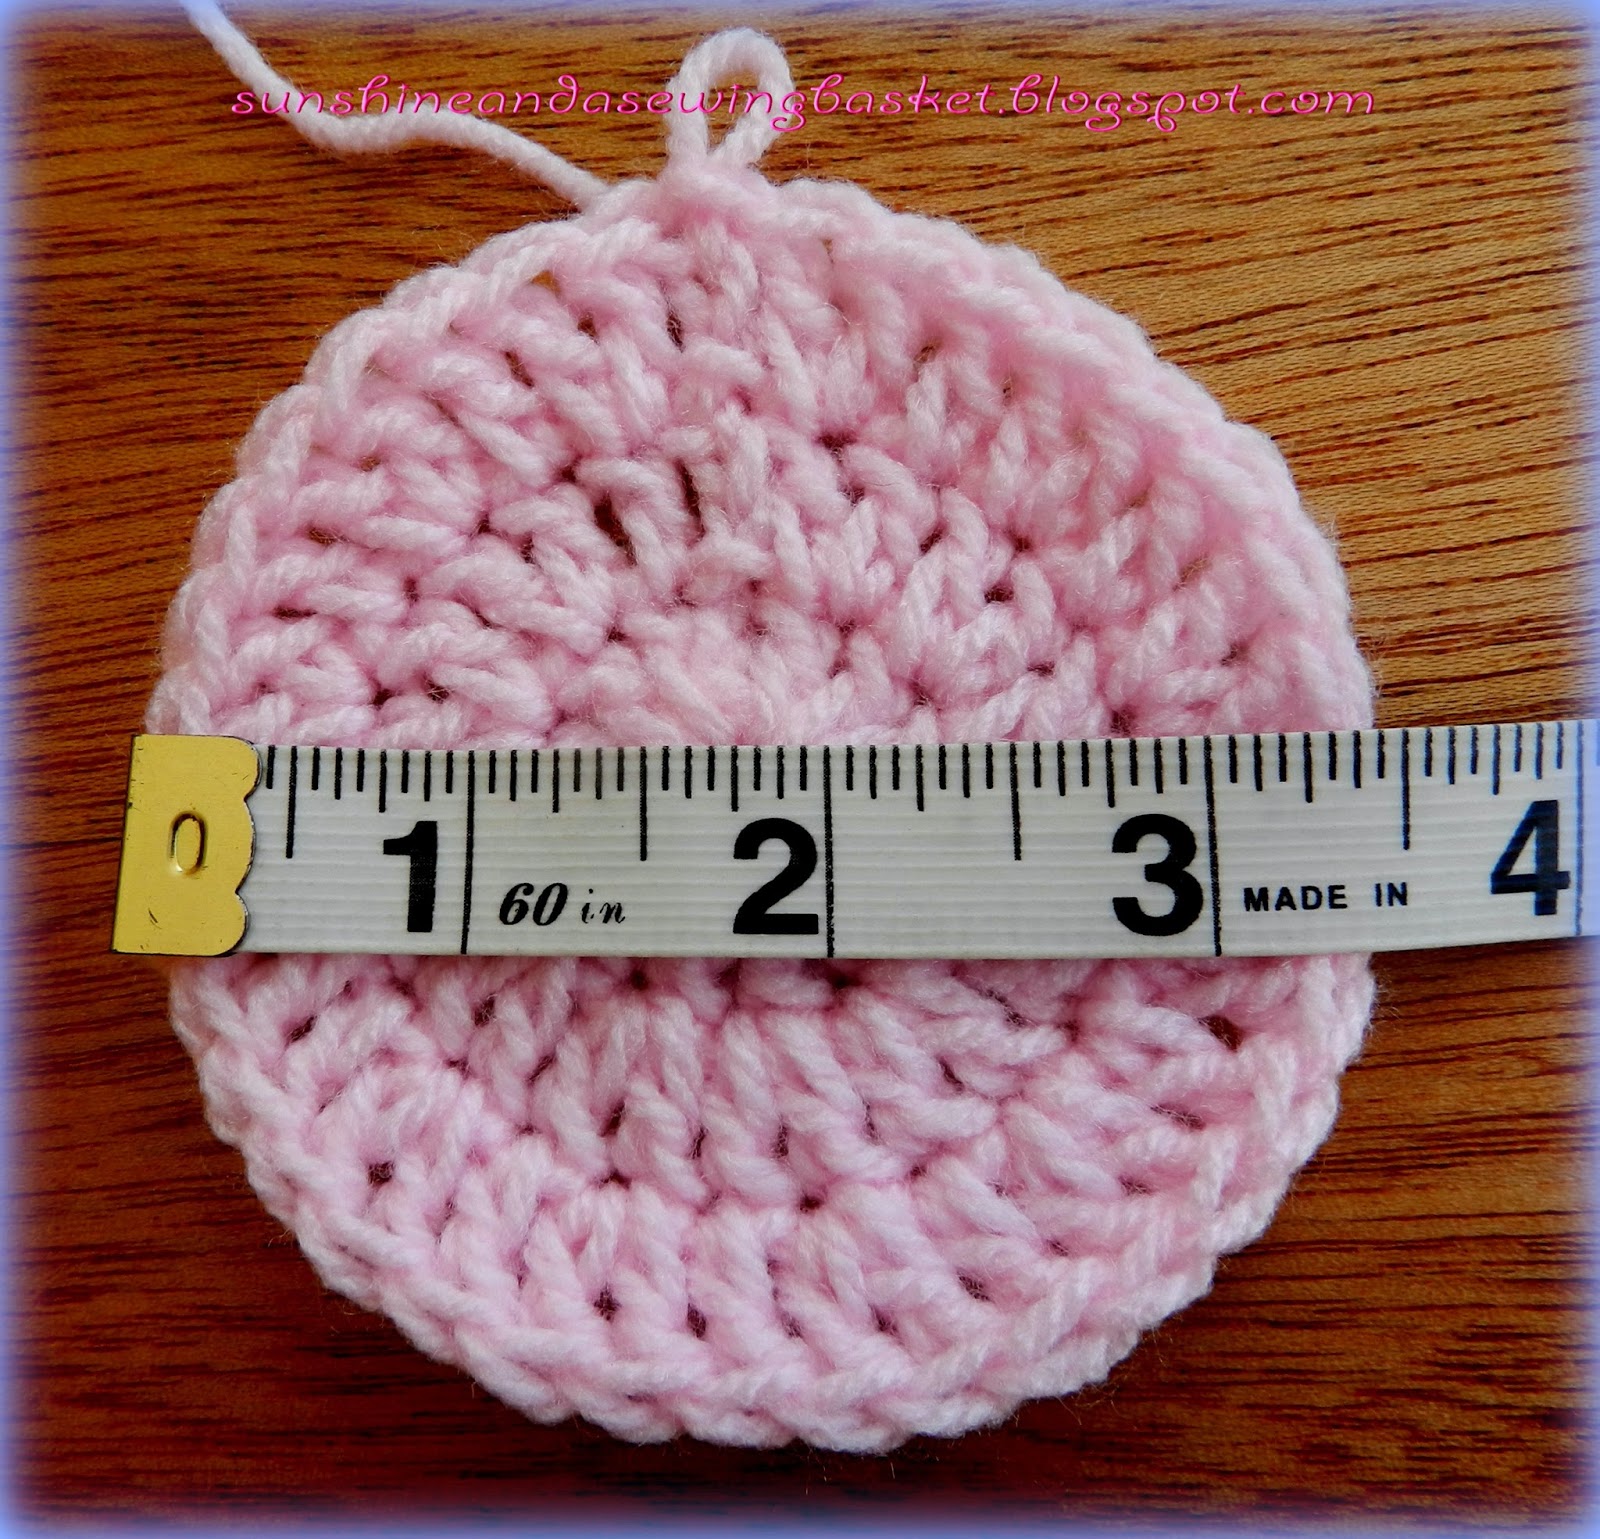
Sizing: This is a useful chart to use for choosing the appropriate size for your hat.

- I have found using the approximate diameter in relation to the age has been successful. I have made more than 100 hats and beanies using this formula, all with great success. And then again, making hats to fit 100% is almost impossible, it is an inexact science, since heads come in many different shapes and sizes. So don't sweat the small stuff .. if you are a couple of mm's out (preferably under), you will still have a super result.
- To get closest to the correct diameter, I have sometimes done my last increase row in single crochet (sc) instead of double crochet (dc). Or used single crochets or half double crochets (hdc) in all rounds to make the crown.
- This pattern is for the smallest hat I make; if you want to make a bigger hat, in it's simplest form this is how the increases work, starting in Row 2: 2dc in each stitch; Row 3: 2dc, 1dc, 2dc etc; Row 4: 2dc, 1dc, 1dc, 2dc etc; Row 5: 2dc, 1dc, 1dc, 1dc, 2dc etc; Row 6: 2dc, 1dc, 1dc, 1dc, 1dc, 2dc etc; so in each row you are adding an extra dc in between the 2dc's. If you begin with 12dc in your circle, each row after that will be 12dc's more i.e. 12dc's, 24dc's, 36dc's, 48dc's ....
- Be sure to measure the diameter across your work after adding each subsequent increase row .. you ideally need to have a measurement just under the measurement in the chart.
So lets begin .........

Row 1
Into circle ch2 or Sdc, 12dc, join with a sl st to complete row (12dc)

Row 2
Ch 3 or Sdc, 1dc into same st as join, 2dc into each dc from Row 1; join with a sl st into top of 3ch or Sdc to complete row (24dc)
Ch 3 or Sdc, 1dc into same st as join, 2dc into each dc from Row 1; join with a sl st into top of 3ch or Sdc to complete row (24dc)

Row 3
Ch 3 or Sdc, 2 dc into next st, *1dc into next st, 2dc into next st*; continue *~* to end of row, finishing with 2 dc into last dc; join with a sl st as before to complete row (36dc)
Ch 3 or Sdc, 2 dc into next st, *1dc into next st, 2dc into next st*; continue *~* to end of row, finishing with 2 dc into last dc; join with a sl st as before to complete row (36dc)
At this point, the diameter across your work should measure +- 3.5 inches or 9 cm. This is the smallest hat I make, which fits a New Born babe. You could take your measurement down to 3 inches or +- 7.5 cm if you wanted to make a really teeny hat. See how to adjust the diameter in the notes above.


Row 4

Ch 3 or Sdc, 1dc into same st, *skip 1 st, 2 dc into next stitch*; continue *~* to end of row, finishing with 2 dc into second last st; join with a sl st as before to complete row (18 dc pairs)
Row 5
Sl st across to first space between dc pairs. Ch 3 or Sdc; 1dc into same space, *2 dc into each space*; continue *~*to end of row; join with a sl st to complete row (18 dc pairs)


Now comes the border ... an easy border is: 1ch, 1sc in each st to end,sl st in starting 1ch to join. Do 2-3 rows.
Another super way to border a little hat is to do a Reverse Single Crochet st or Crab st. Do 1-2 rows of sc, then a row of Crab st. The link has a very good video tutorial on how to do this versatile stitch. This is how it looks, I love it!


We are done!

Have fun crocheting the little hat, till next time
xxx Pat xxx
Oh thank you thank you thank you! Not one mention of PYE! I am first in line to make this! I already have my hook and yarn out!
ReplyDeleteAn amazing knitted fashion beanie hat which comes in numerous fascinating colors and is right according to the current trends and fashion. beanie manufacturers
DeleteOh what a cute hat. Love it. Thanks for sharing. Do you mind if I pin it?
ReplyDeleteOh please do, so glad you like the hat!
DeleteI love this, thanks for sharing the technique x
ReplyDeleteSuch a worthwhile project Pat! X
ReplyDeleteThank you Penny, I hope to be handing over the hats to an Oncology Department for babies in the near future!
DeleteThere is a row 5 written, but then it says "Continue repeating Row 6 until you have the desired length minus ½ inch/1cm. Now comes the border ... an easy border is: 1ch, 1sc in each st to end,sl st in starting 1ch to join. Do 2-3 rows.". Is row 6 the same as row 5 ?
ReplyDeleteWell spotted and a big thank you! Yes it is, and it now reads Row 5!
DeleteThanks for posting this, It is great to have the instructions for the different ages.
ReplyDeleteThank you very much for the pattern and the measurements!
ReplyDeleteOlga~
I do enjoy making beanies and hats, and I have loved making up one or two of your sweet patterns Olga!
DeleteSo pretty and such a lovely shade of pink :)
ReplyDeleteJillx
Thank you Jill, the little hats are soon to find a home in an Oncology Department for babies, can't wait to hand them over!
DeleteI have just come to your blog via http://www.thehomemadeheart.typepad.com and enjoyed going through your posts. I have only just started knitting again and now your blog has made me feel that I would like to start crocheting again. I wonder if you would like to have a look at my blog which is mainly about embroidery and life as the wife of a rural parish priest in England. http://www.addisonembroideryatthevicarage.co.uk. with best wishes, Mary Addison
ReplyDeleteWow Mary, your hand embroidery is simply amazing! And you have some yummy recipes, nice to meet you!
DeleteIt's fun to crochet this hat! Very sweet result for a newborn hat!!!! Thank you very much!
ReplyDeleteGreetings from Germany
Thank you for this pattern, just whipped one up quickly! Any chance you have an equally easy bootie pattern? Fellow Randburger.
ReplyDeleteTeaching myself to crochet to pattern, this is my first attempt and really pleased with result. It really helped to have the pattern and a picture to show what it should look like...many thanks
ReplyDeleteThis is a darling little hat. I finished it with the crab stitch and you are right it is even more adorable. Thank you for sharing.
ReplyDeleteHi Pat, I am still a fairly inexperienced crocheter, but recently one of our hospitals has asked if we can help with an appeal for 5,000 baby hats. I came across your pattern and thought I'd give it a try. Are there any difficulty bits I need to look out for?
ReplyDeleteHello Louise, you should have no problem, the pattern is easy! Please let me know if I can assist in any way! Regards Pat
DeleteWhat is the crab stitch? Where is the link? and the Sdk, standing double crochet?
ReplyDeleteHello Annette, I have highlighted both links in green for you and tested that they both work; please let me know if you have any problem linking up, regards Pat
DeleteTq share..I like it
ReplyDeleteThis comment has been removed by a blog administrator.
ReplyDeleteThank you for sharing this well written pattern. I'm going to crochet red hats for babies,and toddlers with heart ailments.
ReplyDeleteThank you for sharing this well written crochet hat pattern. I'm going to crochet red hats for babies and toddlers with heart ailments.
ReplyDeleteThis beanie looks charm and cool!! I'm going to try this. Thanks for this tutorial. Check out the my version in Cool Beanie Hats
ReplyDelete