Showing posts with label flowers. Show all posts

Friday, 31 July 2015

Flowers for Memories ~


Yarndale 2015 ... and this year the call has gone out for ...
F L O W E R S
 an abundance of colour translated into flowers of all shapes and in any discipline of yarn art, be it knitting or crochet, with pretty embellishments if you feel so inclined ... what a glorious brief!!

Since the early days of my crochet journey, when I discovered the joy of making beanies and hats, I have had a love affair with crocheting flowers to add to sweet little creations for girls;  hats with huge flowers or a posy of small flowers with dainty beadwork in the centres adorning their brims.  And then I started making tea cosies, and my word, I had such fun decorating them with gorgeous arrangements on the tops!  Headbands and earwarmers, bookmarks and handbag handles, they all got the floral treatment;  great for stashbusting too!

And a beautiful blanket, designed by Heather of The Patchwork Heart ..... my blanket was made as a gift for a very dear friend.


So imagine my delight when I read that this year the theme would be ..... flowers!  Without ado I scoured my files and folders for my favourite patterns ..... a goldmine of fabulous and easy and free patterns can be found on Pinterest ....... some of my favourite bloggers have designed lovely flowers too.


This is the method I use to neaten off the back and attach a clasp or pin, should you want to use the flower or posy as a brooch.

Position your leaf or leaves if any on the back of the flower and stitch on neatly using the tail on each leaf.

Now using either a colour from your flower, or the colour of your leaf
crochet a little three to four round circle, depending on how much you need to cover in the way of stitching and threads.
You need to have a +- 15 cm tail at the start of either your magic circle (or preferred method) which needs to be on the right side of the patch,
and a longer tail at the end.


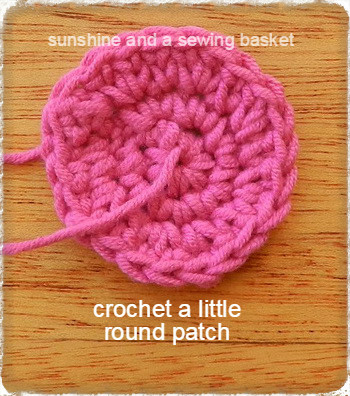
Using the tail in the centre of the patch, 
stitch your pin neatly and securely, 
take the thread to the back of the patch and secure.

Position the patch on the back of the flower, making sure that all your stitchery is neatly covered ... and sew in place with the long tail you have left
on your last row of the patch.


A good idea is to pin the flower to yourself with a straight pin .. taking care not to injure yourself.  You may need to position the clasp a little higher than the centre
so that the flower doesn't flop forward if pinned to a garment 

Here are some of the patterns I have used ~


Autumn Berry Flower


Hellibore bloom


Coiled Roses


Five Petal Tropical Flower


Triple Layer Flower
attic24.typepad.com/weblog/triple-layer-flower.html


Pretty flower


May Roses


I hope you have as much fun creating beautiful flowers as I did .... they will be winging their way to Skipton in the next day or two! 

Local Skipton crochet artist Sheila Metcalfe raises funds on behalf of the Alzheimers Society. Flowers for Memories, sure to be an amazing display of crochet flowers, will no doubt be a huge draw at this year's Yarndale show and at the same time add much needed funds for her most worthy cause. 
Here is her postal address to which to send your
floral contributions!

Sheila's Flowers
Box 97 Skipton
North Yorkshire
BD23 9EN
England UK

The due date is September 11 ~
more details re size etc can be found on
the Yarndale Blog


Have a most wonderful weekend
Much love Pat


Sunday, 22 February 2015

Spring Roses Tea Cosy

We have had the hottest weather of late; a heatwave of note, prolonged and uncomfortable .... more so because it makes working with wool a big no-no!! And so when we woke to a cloudy and cool Saturday here in my neck of the woods, I literally fell on my yarn and hook with such delight, and finished a WIP .. 

Spring Roses Tea Cosy Ta-dahhh!


I did not have the tea pot to hand to work around, just measurements, quite a challenge.  After scrapping two designs, I was finally happy with this sweet cosy, in white with leaves in beautiful Spring Green, and roses in Soft Yellow, Wisteria and Fondant, these all being gorgeous colours in the Stylecraft Special DK range.  

There is no complete pattern as such, I have notes on the body in white, and details of how I finished it off. The pattern consists of two rows :: 1 row in hdc, 1 row in hdc but including the bobble stitch every 6th stitch.  The bobbles are offset (see photo).  The widest measurement around the 'belly' of the pot is 40cm. I worked the body in two pieces and sewed the pieces together

First side:
I started with around 42 chains.
Row 1 ~ First hdc in 2nd chain from hook, hdc to end, turn
Row 2 ~ 2ch, hdc to last 3 sts, ch 1, miss one st, hdc to end. This forms the buttonhole, turn
Row 3 ~ 2ch, 9hdc, bobble st in next stitch (note here :: the bobble st is worked on the wrong side of your work), *5hdc, bobble st, continue to end, turn
Row 4 ~ 2ch, hdc to last 5 sts, and turn.  This forms the button hole strip.
Row 5 ~ 2ch, 1hdc, bobble st in next stitch, *5hdc, bobble st, continue to end, turn
Row 6 ~ 2ch, hdc to end of row
Row 7 ~ 2ch, 4hdc, bobble st in next stitch, *5hdc, bobble st, continue to end, turn
Now continue until you have the height you need minus about 2cm, which we will take up with decreasing rows. For this cosy, that worked out to a total of 19 rows from the start row ( 9 bobble rows and 10 plain hdc rows).

Row 20 ~ (or your next row depending on how many rows you have for the height you need) and (Right side) 2ch and 4hdc, 2hdc tog., *4hdc, 2hdc tog., continue from * to end of row, turn
Row 21 ~ Wrong side :: 2ch and 3hdc, bobble st in next st, *4hdc. bobble st, continue to end and hdc last however many sts you have left, I had 2 so I worked 2hdc, turn
Row 22 ~Right side ::  2 ch and 1hdc, 2hdc tog, *3hdc, 2hdc tog; continue to end, turn
Row 23 ~ Wrong side :: 2ch, hdc to end, turn
Row 24 ~ Right side :: 2ch,and 1hdc, *2hdc tog, 2hdc, continue from * to end, turn
Row 25 ~ Wrong side :: 2ch, hdc to end. That completes one side.

Second side ~
Repeat the instructions for the first side, except cast on stitches minus the buttonhole strip .. so I started with 36 chains instead of 42 chains.

Note:  once you have started the decrease rows, just work with the stitches you have.  You may have fewer or more sts that I had, remember that you are going to cover the decrease rows with masses of flowers and leaves, which will cover up with decrease rows anyway!

Once you have completed the two sides, fit to your tea pot and sew up the sides where necessary.  One seam will be short to come up to the bottom of the spout. The handle side closes with a pretty button and buttonhole.  I left the gaps open to the top of the cosy almost all the way, just stitching the last 1.5cm of each side together so that I had a complete round 'cap' onto which I attached the leaves and flowers 


I embellished the cosy with May roses and leaves from Lucy's pattern on Attic 24.  I added a row of slip stitches in green for a small neat edging along the handle and spout edges. For the finish on the bottom edge, I used a braid stitch in green :: see my post on Braid edging here


Hope you are having a good Sunday wherever you are, take care until next time,
Pat xxxxxxxxxx

Monday, 21 July 2014

A pop of colour!


Sometimes it feels so good to spoil oneself with a pop of colour for the home when outdoors is dull and dry .. I did last week!  I was having lunch with a dear friend of very long standing .. 51 years in fact ... at a lovely restaurant called the Silver Birch situated inside a nursery. I spotted a display of gorgeous Calla Lilies, or to be botanically correct Zantedeschia, as we walked in through the fabulous shopping area housing indoor plants and de-vine goodies for the garden and home.   I decided as we were leaving to spoil myself and this is the beauty I came home with! Delicious pink blooms to brighten up a little corner in my lounge!


Such loveliness♥

~ Flowers don't worry about how they are going to bloom.
They  just open up and turn toward the light, 
and that makes them beautiful ~
Jim Carrey


My Blissful Mood Blanket is pleasing me hugely .. Maybelle Flower Squares in favourite colours.  49 squares done and joined with 35 squares to go.  I am starting to think about borders ... at the moment I am leaning towards either a white lacy border, or a many-rowed border in white but also featuring some of the colours!


and on the subject of blankets, the afghan I made as a wedding gift was delivered on Sunday, and the happy couple were over the moon with it ~ Happy heart ~


I have added a second group of blogs listing some of my favourite foodies we have in South Africa, really top notch and talented, I often go to their sites for inspiration.  Do take a peek, I find most recipes can be adapted no matter where you live! 

I am working on a lovely project at the moment, called Emily's Garden Blanket ... you can see pictures of the blanket in progress on The Patchwork Heart .. it is quite the most beautiful thing I have seen in ages, and I am making it for another very dear school friend.  Pics of my progress will be in my next blog post!  I am so enjoying this project♥

Chat soon,
xxxx Pat xxx


Sunday, 19 January 2014

I'm a little teapot, short and stout ........

Any time is tea time in our house, we are always ready to settle down to a cuppa and a biscuit or two.   So my (aforementioned!) tea cosy is in progress I am delighted to say!  I have taken my choice of colours from a cute set of mugs I found;  as soon as I spotted them, I thought 'I can see a tea cosy in clear turquoise, with pretty pink and perhaps white flowers on top'.  And so lucky I was to find this cute little white tea pot.


The body of the tea cosy is finished.  Now for the fun part ... crocheting flowers and leaves to adorn my turquoise cosy!


Using this easy pattern for the cosy,  and then inspirations for flowers and leaves from three of my favourite blogs ( love, love, and love them) I made up roses, daisies and teeny flowers, big leaves and small leaves and linked leaves... 

Next, I started placing the flowers and leaves here and there, playing with different looks and ideas, too much?? too little??  And to add to the mix, once I started crocheting the flowers and leaves I became totally caught up and couldn't stop, I find I really enjoy making small items, like flowers and squares and hearts.  So I had a nice selection of flowers and leaves from which to choose.  


I am going to spend a lazy Sunday afternoon sewing on the decorations with the threads, and perhaps make up a butterfly or two to complete it.   Thank you for dropping by, do have a wonderful week, hugs and blessings,  Pat xxxxxxxxxxxxxxxxxxxxxxxx

Oh and by the way, thank you so much for all the kind comments about our adored doggies;   Dexter Dog and Layla the Princess send their love xxxxxxxxxxxxxxxxxx


Wednesday, 1 January 2014

A brand new year ~


~ Such glorious colour in our summer garden ~


... a teeny wee visitor sitting on my front door handle!

~ enjoying my first project in gorgeous 100% cotton yarn, pretty head bands ~


~ a Liverpool scarf for my son (fervent supporter!!) ~

~ I found these cheery mugs, I think a tea cosy in these colours could be fun -
watch this space!!

I started to blog as a way of keeping a record of my day to day, a journal to look back on in years to come ....
I love being part of Blogland, in the company of the talented, sometimes funny, but always completely down to earth bloggers.
Thank you for keeping me company, I hope you will stay a while.
Wishing you all a fabulous, fun-filled year, abundant with creativity and cheerfulness

Until next time
Much love
Pat
.